Entering Budgets in QuickBooks Online
Having have worked in Financial Planning and Analysis for a variety of organizations throughout my career, I have seen first hand how important having a budget as a roadmap for your business is.
Planning your activities, and then assigning numbers to that plan is a favourite process of mine. It is exciting to see goals distilled into plans, and then a budget created to monitor your progress towards those goals.
Having a budget is also an important management tool.
Using QuickBooks to enter and manage your Budget
If you are using the Plus version of QuickBooks Online there is a budgeting feature built in.
You can access the budgeting function from the gear icon on the top right, and then under tools.

You can then create a new budget or edit an existing budget.

You can use the tools in QuickBooks to create a budget based on your actual numbers to date, or use numbers from the prior year as your starting point.

There are standard reports available in order to compare your actual results with your budget, and monitor your progress throughout the year.
For a step by step look at how to create or enter your budget in QuickBooks Online, you can watch this week's video!
If you would like assistance working on your budget, or entering or creating it in QuickBooks don’t hesitate to reach out.
Good luck with your planning, and the growth of your organization!
Still need help?
Check this out.
How to Enter Budgets in QuickBooks Online
This QuickBooks tutorial will show you how to enter or create your budget in QuickBooks Online, and then run reports to compare your actual results to the budget to see how your business is performing.
Let's go!Still need help?
Book a session! We can work together to solve your specific QuickBooks Online questions.
Let's go!Video Transcript:
Hi, Kerry here from MyQuickBookKeeping. Did you realize that you can put your organization’s budget inside QuickBooks? Today, I’m going to walk through the steps. I’m going to show you the different methods to put the numbers in, the different options you have to split it out, and then at the end, we’ll have a look and see the reports that show your budget and then the report that will show your budget against the actual results. That’s the important part!
Here we are in a sample company. And from the gear icon, have a look at under Tools and select Budgeting. We’re going to add a new budget. In the top right hand corner, select the green button. Let’s name our budget, 2018 Budget. Here we go. There is no need to change the fiscal year. And here we have the options for different intervals.
We can divide this budget over twelve months, quarterly or even yearly which would require us to just enter one number for each of the different categories that we have. This should be useful if you’re doing a high level budget over a number of different years. You could then run a report over the years just to compare those totals. We’re going to use monthly intervals today.
We have the option to pre-fill the data. So we can use either last year’s actual numbers. This would be nice if you wanted to look over the actual results and then make any changes based on your assumptions for the year ahead. I don’t know perhaps increase sales ten percent, reduce your rent if you are moving, just different things that based on what you had from the prior year. That makes sense hopefully.
Or we can pre-fill with the actual data of 2018 and because we’re halfway through the year, I’m going to select that option. Now as you can see here, the table is being filled with numbers up to date. So while I am doing this, here in July 2018 we have numbers up to July 2018. Now, this next option is really great. You can prepare a different budget for every class or the specified customers. Let us have a look and see what that looks like.
Perhaps you have a different budget for each of your sales departments and you would like to set targets and run reports. You could change the name here to the 2018 budget for salesperson 1. And then you could go to here. Select all the customers who are served by salesperson 1. So we just go, click down all of salesperson 1’s customers, maybe they still have the A’s B’s and C’s. Let’s see. And then we would press tab. There we go. And we’ve pre-filled only for those particular customers. It doesn’t look like much happened so sales been made into one of them and some cost of good sold.
But if you had a different budget for each of the salespeople or for each different customer, zone or how you want to divide it up, you could have a different budget for each of them. Now, if we split by class, we then have the option to have a budget for each one of our classes and you can see for this particular sample company, it is divided into 4 geographic regions and admin. Not specified is typically transactions that you don’t have a class assigned to. Usually, you get a warning, yeah I wouldn’t expect to see a lot of numbers in not specified but sometimes it happens.
Now, if we select East here, we’d want to rename our budget, the “2018 Budget East”. Then we can easily see the budget for the east. If we dropdown here and we create a budget for the west, for example or the north, we’ll go for the north. And we type north here. Here we go. We can toggle between these two budgets right here. So then it would be north and then we toggle between the budget for the north and the budget for the east. I don’t think there is actually much in here. Yeah, a little bit but not much.
But today, we’re going to prepare a sample budget by month for the whole year. And we’re not going to subdivide it.
So let’s click down here, create budget, just a little bit of an odd thing because it doesn’t actually create the budget. It takes us to a page where we can create the budget. So let us scroll down to sales here. We have 2000 in February, 1500 in April, let us continue that pattern. So just remember I am using a sample company and in your organization you know what your sales are going to be. You are not just going to be random and making it up like I am.
So sales of product income here. We can see a total so far this year of 19,050. So let us just do a little bit of math. Let us remove that July number of 3900. So we have 19050-3900. It gives us 15,150. And let us divide that by 6. We have an amount here of 2,525. I want to show you how auto-fill works. So let us go to August. Type out 2525 in here. And auto-fill the rest of the year. We have that same amount across the year. We are now expecting to have sales of product income at 31,675 dollars.
Let us go down to the expenses. We have interest coming in at 95 dollars a month. Looks like that one’s doubled up so we pop into here. We’ll type 95 dollars and we’ll fill this automatically right across. Now let us do the same for rent. Here it is here. And to lease payment $1,250. We can see once again something odd has happened in May there where the expenses doubled up and there is nothing in June. If this was your company, you would know what happened there.
Now let’s say in November we are going to need some extra storage capacity. So we know, we are going to have some extra expense for rent. So will just increase this to $2,500. So easy to change and enter these numbers as we go. Depreciation is clearly the same each month. Here it is. So we can pop this one in as well. We have to put in some numbers in Utilities. Yeah, this could be a little bit more seasonal, different weather or climates, whether it is colder in certain months or perhaps hotter and we need to run the air conditioning more.
So we’ll just randomly put numbers in here. We’ll say in August, say it is 350. And then press tab across to September, it is going to drop down to 300. And in October, 250. November started to get a little colder again and December, with lots of heating. If this was your organization you would be looking at utilities bills, you would be looking at your history, you wouldn’t just randomly make numbers up like this. So now you can see we’ve popped some numbers and we haven’t filled everything in by any means. Let’s save this budget and see what happens next.
So here is our budget and what are our options. Let us run a budget overview report. In here we can see that we have put in some sales of product income here. We have put in our rent here. We have put some utilities in and depreciation is in here. So these are the numbers that we entered in for the last half of the year. Let us pop back out to the budget section. I prefer to do it this way. Go to budgeting. If we have done different budget for east, west, north and south, then they would be showing up here as well. We also have the option to copy the budget. It would be great if we have done it for the east or the west. For example, then we could just copy it and change the numbers for every region we wanted.
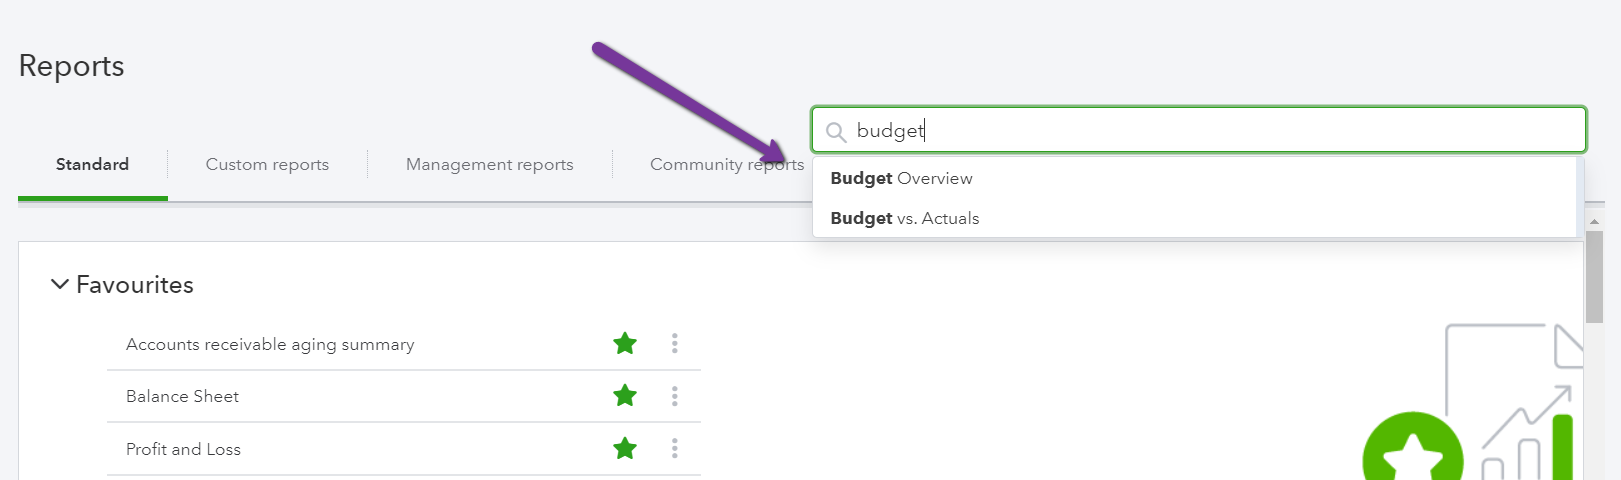
Another option that we have here is to Run Budgets versus Actuals Report. Now it is not going to be very interesting because of course, we filled it in with the actuals for the first part of the year. And then the last half of the year hasn’t happened yet. But this is the report that you would use to watch a progress against the budget throughout the year as you filled in your actual numbers. Now, if you go to the reports section, here reports on the left hand tab, and we scroll down, we can see here we have the budget overview and the budget versus actual reports. These are the two reports that we pulled up when we went to this budgets tab.
So once again, you can find the same thing in so many different ways with QuickBooks. It makes it so easy for you to work with.
That was a very quick overview of what can be done with budgets in QuickBooks. Obviously, you’re going to put a lot more time into the planning before you start throwing numbers around in there. If you require most sophistication, there are some great third party apps. Fathom is one that’s particularly good. You can upload your budget from an Excel spreadsheet right into the app, which integrates with QuickBooks so you’ll have a lot more reporting functionality from that.
If you have any questions, do reach out. You can send me a message. There’s also a link below. You can book a consultation and we can see perhaps if we could work together, which would be quite exciting. There’s my month-end checklist so make sure you download that. You will also get my newsletter, which will keep you up to date with any of the smaller changes in QuickBooks perhaps things that I don’t have a video on or details about some of the apps that might help you to make the most out of your QuickBooks. While you’re down there, click like, subscribe to my channel and if there is anything else you’d like to know about, please do let me know because my next video could be for you. Cheers!
Video Transcript:
Hi, Kerry here from MyQuickBookKeeping. Did you realize that you can put your organization’s budget inside QuickBooks? Today, I’m going to walk through the steps. I’m going to show you the different methods to put the numbers in, the different options you have to split it out, and then at the end, we’ll have a look and see the reports that show your budget and then the report that will show your budget against the actual results. That’s the important part!
Here we are in a sample company. And from the gear icon, have a look at under Tools and select Budgeting. We’re going to add a new budget. In the top right hand corner, select the green button. Let’s name our budget, 2018 Budget. Here we go. There is no need to change the fiscal year. And here we have the options for different intervals.
We can divide this budget over twelve months, quarterly or even yearly which would require us to just enter one number for each of the different categories that we have. This should be useful if you’re doing a high level budget over a number of different years. You could then run a report over the years just to compare those totals. We’re going to use monthly intervals today.
We have the option to pre-fill the data. So we can use either last year’s actual numbers. This would be nice if you wanted to look over the actual results and then make any changes based on your assumptions for the year ahead. I don’t know perhaps increase sales ten percent, reduce your rent if you are moving, just different things that based on what you had from the prior year. That makes sense hopefully.
Or we can pre-fill with the actual data of 2018 and because we’re halfway through the year, I’m going to select that option. Now as you can see here, the table is being filled with numbers up to date. So while I am doing this, here in July 2018 we have numbers up to July 2018. Now, this next option is really great. You can prepare a different budget for every class or the specified customers. Let us have a look and see what that looks like.
Perhaps you have a different budget for each of your sales departments and you would like to set targets and run reports. You could change the name here to the 2018 budget for salesperson 1. And then you could go to here. Select all the customers who are served by salesperson 1. So we just go, click down all of salesperson 1’s customers, maybe they still have the A’s B’s and C’s. Let’s see. And then we would press tab. There we go. And we’ve pre-filled only for those particular customers. It doesn’t look like much happened so sales been made into one of them and some cost of good sold.
But if you had a different budget for each of the salespeople or for each different customer, zone or how you want to divide it up, you could have a different budget for each of them. Now, if we split by class, we then have the option to have a budget for each one of our classes and you can see for this particular sample company, it is divided into 4 geographic regions and admin. Not specified is typically transactions that you don’t have a class assigned to. Usually, you get a warning, yeah I wouldn’t expect to see a lot of numbers in not specified but sometimes it happens.
Now, if we select East here, we’d want to rename our budget, the “2018 Budget East”. Then we can easily see the budget for the east. If we dropdown here and we create a budget for the west, for example or the north, we’ll go for the north. And we type north here. Here we go. We can toggle between these two budgets right here. So then it would be north and then we toggle between the budget for the north and the budget for the east. I don’t think there is actually much in here. Yeah, a little bit but not much.
But today, we’re going to prepare a sample budget by month for the whole year. And we’re not going to subdivide it.
So let’s click down here, create budget, just a little bit of an odd thing because it doesn’t actually create the budget. It takes us to a page where we can create the budget. So let us scroll down to sales here. We have 2000 in February, 1500 in April, let us continue that pattern. So just remember I am using a sample company and in your organization you know what your sales are going to be. You are not just going to be random and making it up like I am.
So sales of product income here. We can see a total so far this year of 19,050. So let us just do a little bit of math. Let us remove that July number of 3900. So we have 19050-3900. It gives us 15,150. And let us divide that by 6. We have an amount here of 2,525. I want to show you how auto-fill works. So let us go to August. Type out 2525 in here. And auto-fill the rest of the year. We have that same amount across the year. We are now expecting to have sales of product income at 31,675 dollars.
Let us go down to the expenses. We have interest coming in at 95 dollars a month. Looks like that one’s doubled up so we pop into here. We’ll type 95 dollars and we’ll fill this automatically right across. Now let us do the same for rent. Here it is here. And to lease payment $1,250. We can see once again something odd has happened in May there where the expenses doubled up and there is nothing in June. If this was your company, you would know what happened there.
Now let’s say in November we are going to need some extra storage capacity. So we know, we are going to have some extra expense for rent. So will just increase this to $2,500. So easy to change and enter these numbers as we go. Depreciation is clearly the same each month. Here it is. So we can pop this one in as well. We have to put in some numbers in Utilities. Yeah, this could be a little bit more seasonal, different weather or climates, whether it is colder in certain months or perhaps hotter and we need to run the air conditioning more.
So we’ll just randomly put numbers in here. We’ll say in August, say it is 350. And then press tab across to September, it is going to drop down to 300. And in October, 250. November started to get a little colder again and December, with lots of heating. If this was your organization you would be looking at utilities bills, you would be looking at your history, you wouldn’t just randomly make numbers up like this. So now you can see we’ve popped some numbers and we haven’t filled everything in by any means. Let’s save this budget and see what happens next.
So here is our budget and what are our options. Let us run a budget overview report. In here we can see that we have put in some sales of product income here. We have put in our rent here. We have put some utilities in and depreciation is in here. So these are the numbers that we entered in for the last half of the year. Let us pop back out to the budget section. I prefer to do it this way. Go to budgeting. If we have done different budget for east, west, north and south, then they would be showing up here as well. We also have the option to copy the budget. It would be great if we have done it for the east or the west. For example, then we could just copy it and change the numbers for every region we wanted.
Another option that we have here is to Run Budgets versus Actuals Report. Now it is not going to be very interesting because of course, we filled it in with the actuals for the first part of the year. And then the last half of the year hasn’t happened yet. But this is the report that you would use to watch a progress against the budget throughout the year as you filled in your actual numbers. Now, if you go to the reports section, here reports on the left hand tab, and we scroll down, we can see here we have the budget overview and the budget versus actual reports. These are the two reports that we pulled up when we went to this budgets tab.
So once again, you can find the same thing in so many different ways with QuickBooks. It makes it so easy for you to work with.
That was a very quick overview of what can be done with budgets in QuickBooks. Obviously, you’re going to put a lot more time into the planning before you start throwing numbers around in there. If you require most sophistication, there are some great third party apps. Fathom is one that’s particularly good. You can upload your budget from an Excel spreadsheet right into the app, which integrates with QuickBooks so you’ll have a lot more reporting functionality from that.
If you have any questions, do reach out. You can send me a message. There’s also a link below. You can book a consultation and we can see perhaps if we could work together, which would be quite exciting. There’s my month-end checklist so make sure you download that. You will also get my newsletter, which will keep you up to date with any of the smaller changes in QuickBooks perhaps things that I don’t have a video on or details about some of the apps that might help you to make the most out of your QuickBooks. While you’re down there, click like, subscribe to my channel and if there is anything else you’d like to know about, please do let me know because my next video could be for you. Cheers!
Still need help?
Check this out.
How to Enter Budgets in QuickBooks Online
This QuickBooks tutorial will show you how to enter or create your budget in QuickBooks Online, and then run reports to compare your actual results to the budget to see how your business is performing.
Let's go!Still need help?
We have what you need. Check out our courses and free resources to get more help managing your finances.
Let's go!