Creating Invoice Custom Fields in QuickBooks Online
If you use custom fields on your invoices to assign a salesperson, or perhaps a referral, or another field you would like to be able to search and report for this video will walk you through how to set them up in the new invoice format.
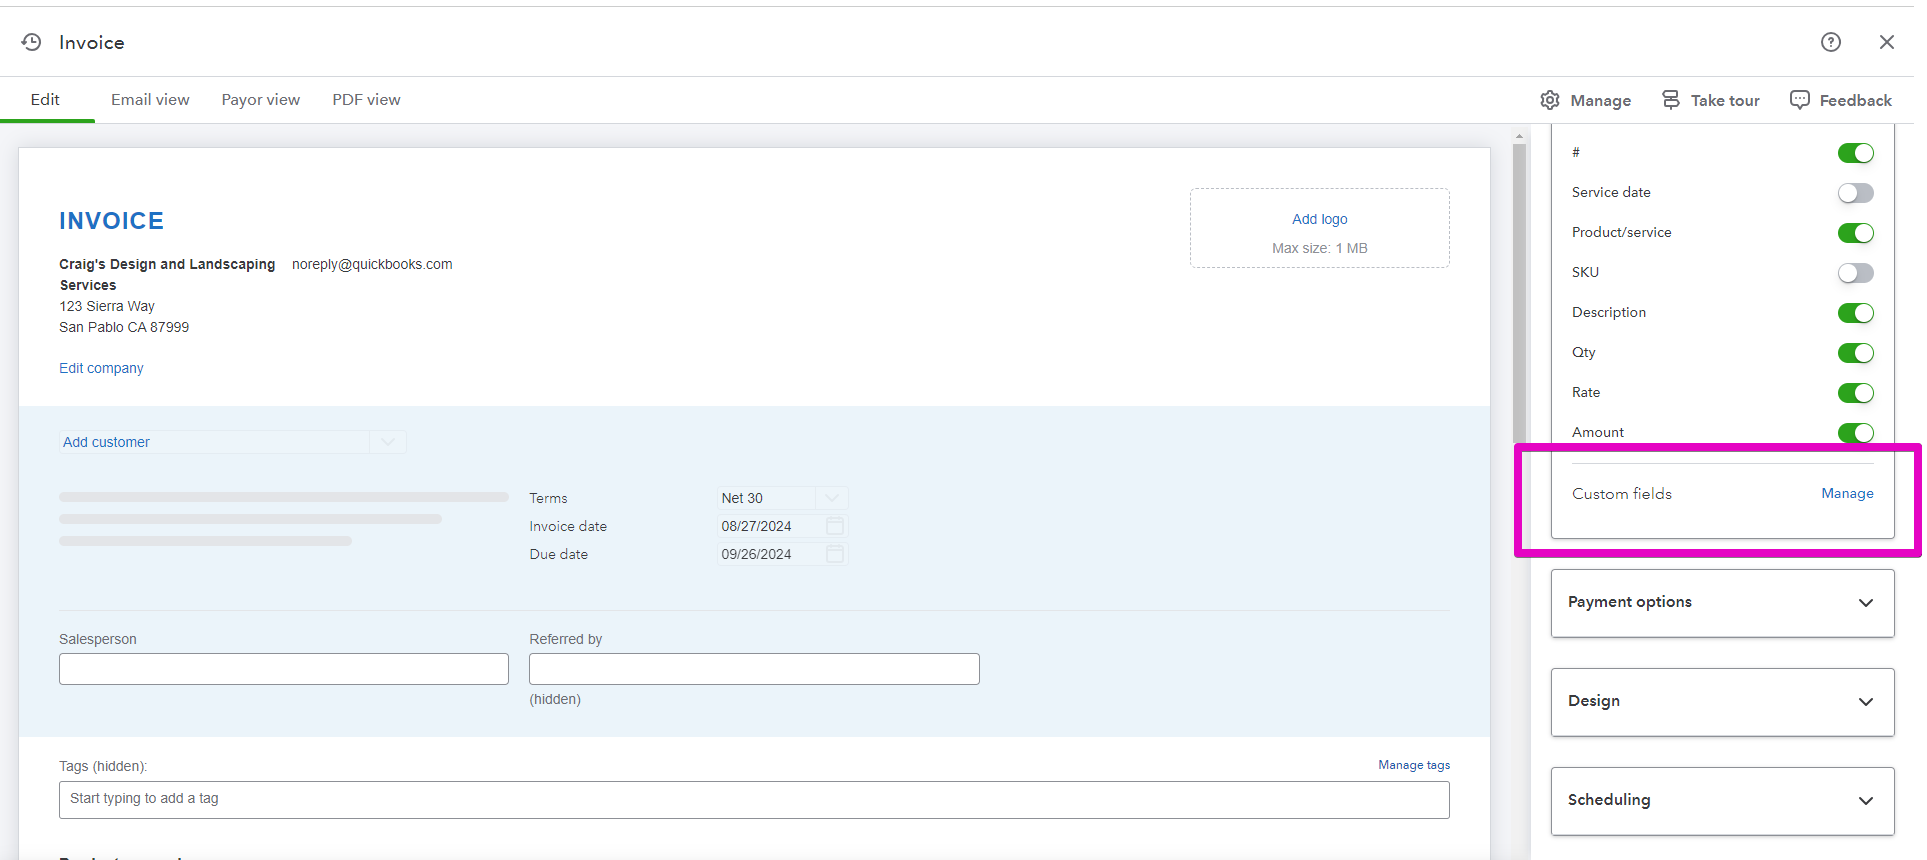
On the right hand side of your invoice under customize there is the option to Manage custom fields

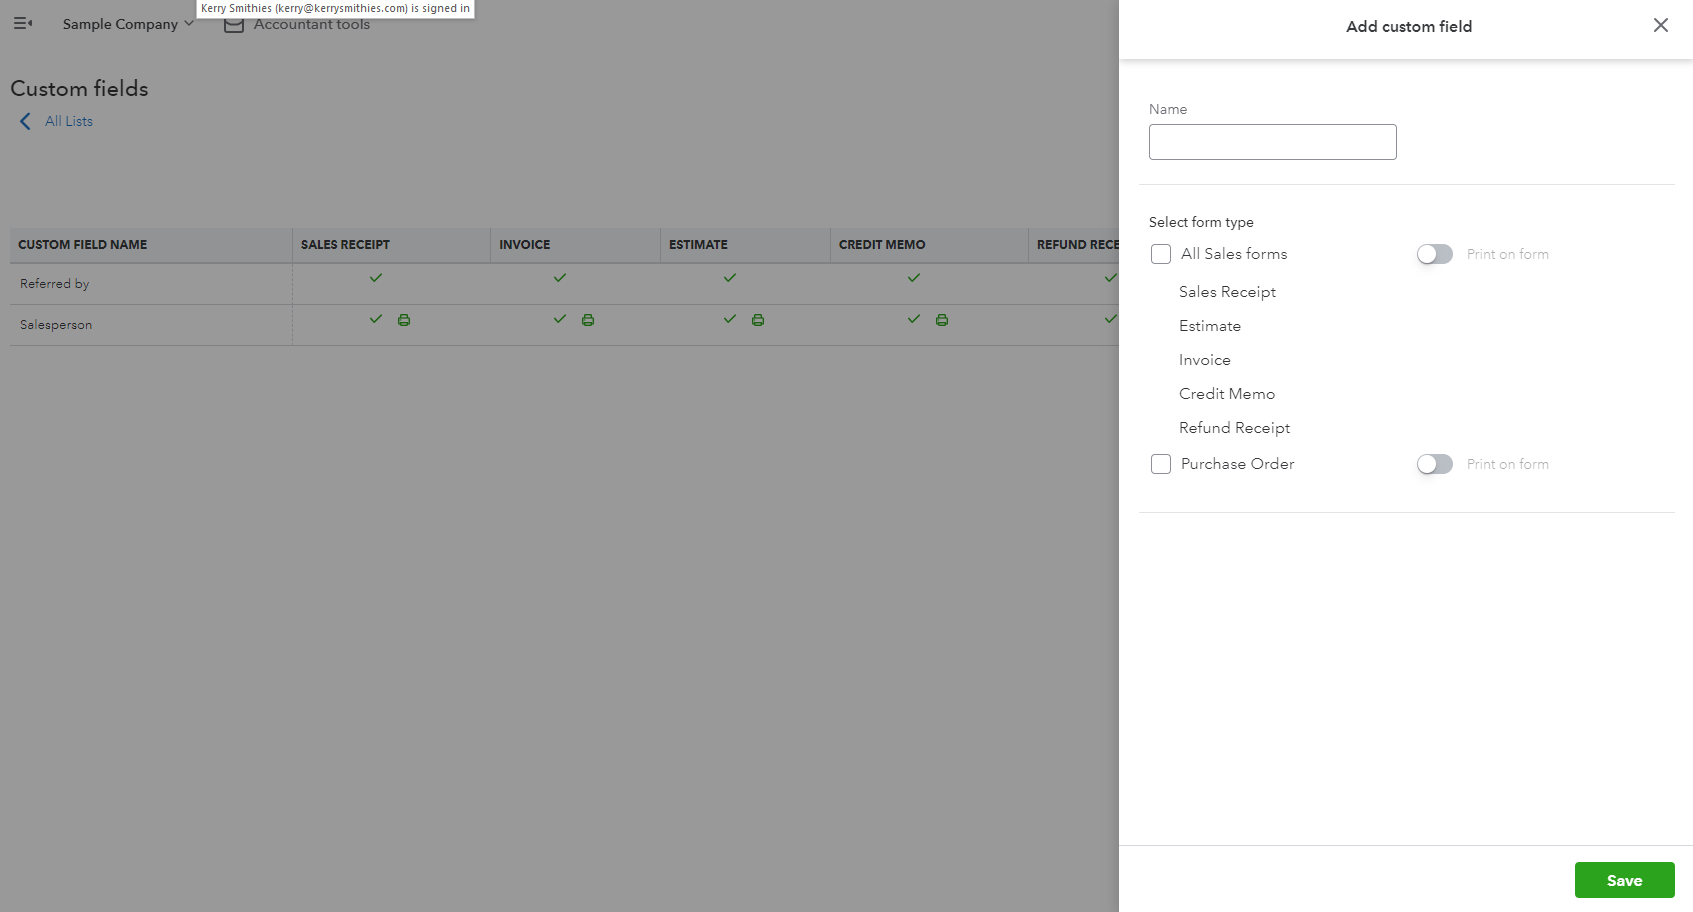
The “Add field” button on the top right is where you enter the names and details of any new fields you would like on your invoices.

You can then select which sales documents you would like the fields to appear on, and whether or not they should be visible to your customer.

Once you have the fields set up you are able to run reports using the different parameters – for example a report by salesperson, if that is one of your custom fields. This can be very useful for managing commissions or sales targets.
Don't hesitate to reach out if you have any further questions, and check out further options below:
Download a free Cash Flow Tips for Troubled Times to guide you to improve your cashflow right now!
Cheers!
Still need help?
Check this out.
QuickBooks Online Plan Comparison
Checkout the latest offers on QuickBooks Online Plans and compare features
Let's go!Still need help?
Book a session! We can work together to solve your specific QuickBooks Online questions.
Let's go!Custom Fields on Invoices in QuickBooks Online
Kerry: [00:00:00] Hi, Kerry here from MyCloudBookkeeping. I work with small businesses and entrepreneurs to help them manage their business finances in QuickBooks Online. If you're not sure if you're using the best plan for your business, check out my plan comparison below and be sure to watch right to the end for useful tips for your business.
I recently prepared a video walking through the new invoice format. It's It's up there. And one of the comments I received was that I didn't explore the custom fields because I knew they didn't work. That was actually not the case. I was not aware they were not working, but they are now. So here's a video to walk through creating custom fields and adding them to your invoice.
So here we are in the sample company. When I'm creating an invoice, unless I'm already in the sales section, I tend to just pop up here and say new invoice. This file is opened up into the new invoice format, which I'm imagining most of you are seeing [00:01:00] right now. And where I'm going to go to is on the right hand side here under manage customizations.
And where are they down here? The custom fields, we're going to manage custom fields. We obviously don't have any set up in here yet. So I'm going to click add a custom field. And the first thing I'm going to add is salesperson. I could spell salesperson. And let's just say we're going to put this salesperson on all sales forms and print it.
So we'll click save. So now you can see we have a custom field for salesperson and it's going to show up and show up on the actual print enabled, I'll show you what that means in a moment, for each of these documents. So now we're going to add another one. Perhaps we want to be able to see who referred this particular customer.
So we'll put referred by and we're going to pop it onto all sales forms, save it, but we don't want this to print on any of our documents. Now I [00:02:00] was expecting to be able to determine which of these forms that went on. I'm quite surprised that I can't. Perhaps when I was testing this earlier, I was in a different version of QuickBooks.
So on some of the versions you do get to select which of these documents it goes on and obviously not in this plan. So if you're looking at your version and you can not have it on a refund receipt or an estimate, for example, then that's great. That's an extra option, but clearly in here, that's not how it works anyway.
So now let's pop back to our invoice. So I'm going to pop to here, go new invoice. And now we can see, we have a field to put a salesperson. and referred by. The referred by shows up as hidden so that won't show on the invoice. However, the salesperson will show up when we create an invoice and print it for our customer.
Hopefully that helps you to understand [00:03:00] how to add custom fields to your invoice in the new format. If you have any other questions about the new invoice format, check out the older video or ask me a question below. It's important for your cashflow that you keep on top of the invoices after you've sent them.
Automated reminders can help with that. I have a video for setting those up and also check out my cashflow tips. There's a download below and hopefully that will help you keep your business on track. So be sure to subscribe. I'm going to be posting a lot more videos about the recent changes and some of the Features of the advanced plan.
Cheers.
Custom Fields on Invoices in QuickBooks Online
Kerry: [00:00:00] Hi, Kerry here from MyCloudBookkeeping. I work with small businesses and entrepreneurs to help them manage their business finances in QuickBooks Online. If you're not sure if you're using the best plan for your business, check out my plan comparison below and be sure to watch right to the end for useful tips for your business.
I recently prepared a video walking through the new invoice format. It's It's up there. And one of the comments I received was that I didn't explore the custom fields because I knew they didn't work. That was actually not the case. I was not aware they were not working, but they are now. So here's a video to walk through creating custom fields and adding them to your invoice.
So here we are in the sample company. When I'm creating an invoice, unless I'm already in the sales section, I tend to just pop up here and say new invoice. This file is opened up into the new invoice format, which I'm imagining most of you are seeing [00:01:00] right now. And where I'm going to go to is on the right hand side here under manage customizations.
And where are they down here? The custom fields, we're going to manage custom fields. We obviously don't have any set up in here yet. So I'm going to click add a custom field. And the first thing I'm going to add is salesperson. I could spell salesperson. And let's just say we're going to put this salesperson on all sales forms and print it.
So we'll click save. So now you can see we have a custom field for salesperson and it's going to show up and show up on the actual print enabled, I'll show you what that means in a moment, for each of these documents. So now we're going to add another one. Perhaps we want to be able to see who referred this particular customer.
So we'll put referred by and we're going to pop it onto all sales forms, save it, but we don't want this to print on any of our documents. Now I [00:02:00] was expecting to be able to determine which of these forms that went on. I'm quite surprised that I can't. Perhaps when I was testing this earlier, I was in a different version of QuickBooks.
So on some of the versions you do get to select which of these documents it goes on and obviously not in this plan. So if you're looking at your version and you can not have it on a refund receipt or an estimate, for example, then that's great. That's an extra option, but clearly in here, that's not how it works anyway.
So now let's pop back to our invoice. So I'm going to pop to here, go new invoice. And now we can see, we have a field to put a salesperson. and referred by. The referred by shows up as hidden so that won't show on the invoice. However, the salesperson will show up when we create an invoice and print it for our customer.
Hopefully that helps you to understand [00:03:00] how to add custom fields to your invoice in the new format. If you have any other questions about the new invoice format, check out the older video or ask me a question below. It's important for your cashflow that you keep on top of the invoices after you've sent them.
Automated reminders can help with that. I have a video for setting those up and also check out my cashflow tips. There's a download below and hopefully that will help you keep your business on track. So be sure to subscribe. I'm going to be posting a lot more videos about the recent changes and some of the Features of the advanced plan.
Cheers.
Still need help?
Check this out.
QuickBooks Online Plan Comparison
Checkout the latest offers on QuickBooks Online Plans and compare features
Let's go!Still need help?
We have what you need. Check out our courses and free resources to get more help managing your finances.
Let's go!.png)